www.esoftwaresource.blogspot.com. Powered by Blogger.
RSS

Hack Computers Inside LAN Network

Today,I will write about hacking computer inside the LAN network.

This technique will be taking advantage of Port 139.

Most of the time,Port 139 will be opened.

First of all,I will do a port scanning at the target computer which is 192.168.40.128.

This computer is inside my LAN network.

I will scan it using Nmap.

[Image: 1_13.jpg]

I get the result and it shows Port 139 is opened up for me.

Now you will need both of these tools:
** USER2SID & SID2USER
** NetBios Auditing Tool

You can get both of them on the Internet.

After you get both of them,put them in the C:\ directory.

[Image: 2_1.jpg]

You now need to create a null session to the target computer.

[Image: 3_3.jpg]

Now open the Command Prompt and browse to the USER2SID & SID2USER folder.There will be 2 tools inside it,one will be USER2SID and another one will be SID2USER.

We will first using USER2SID to get the ID.

[Image: 4_10.jpg]

We will test against the Guest account because Guest account is a built in account.

After we get the ID,we need to do some modification on the ID.

We take the ID we get from the guest account and modified it become
"5 21 861567501 1383384898 839522115 500".

Please leave out the S-1-,leave out all the - too.

[Image: 5_8.jpg]

Now you will see that you get the username of the Administrator account.

In this case,the Administrator account is Administrator.

Create a text file called user.txt and the content will be the username of the Admin account.

[Image: 6.jpg]

Prepare yourself a good wordlist.

[Image: 7.jpg]

Now put both of them in the same directory with the NetBios Auditing Tool.

[Image: 8.jpg]

Now we are going to crack the Admin account for the password in order to access to the target computer.

Browse to the NetBios Auditing Tool directory.

[Image: 9_1.jpg]

Press on enter and the tool will run through the passlist.

[Image: 10.jpg]

In this case,I have get the password.

In order to proof that I can get access to the target computer using this password.

[Image: 11.jpg]

After you press enter,it will prompt you for the username and password.

[Image: 12_6.jpg]

Therefore,just input them inside the prompt and continue.

[Image: 13.jpg]

Target C drive will be on your screen.

[Image: 14.jpg]

In order to prevent from this attack,close down port that you do not want to use such as Port 135,Port 136,Port 137,Port 138 and Port 139.

The download link of the tools will be:
Download Tools.rar

(sumber daripada hackguide4u)

  • Digg
  • Del.icio.us
  • StumbleUpon
  • Reddit
  • RSS

Hack Into Administrator Account

Hello friends, welcome back today i am going to share with you all possible ways to hack admin or administrator account in windows XP. Today i will explain how to hack admin or administrator account in just 2 minutes. So guys get ready to hack your friends systems in 2 minutes.
Most of times specially in our college we don't have the access to the admin account, now suppose you want to install a software on that system. What you will do now? Ask the admin to enter the password for you or simply hack it by yourself. I will tell you frankly that i have never opted method one in my life. Whenever i need administrator right i have hacked it but guys don't do it like that ways because i got suspended from lab twice for doing that.

how to hack admin password,hacking password,reset admin password, system hacking

There are four ways to hack the admin password:
1. Simply accessing Unprotected Administrator Account.
2. Hacking Through Net User Command.
3. Hacking Using the ERD(Emergency Rescue Disk)  Commander.
4. Resetting admin password using Ubuntu Live CD or DVD. 

Lets start from the first technique to hack the admin or administrator password..

1. Simply Accessing the Unprotected Admin or Administrator account.

How this hack works ? When we install windows XP on our system we usually rename the username as our name or some other keyword. But windows always creates the administrator account whenever we set up windows XP. So when you create your user account during install , windows creates two accounts that is one is your username account and other is Administrator account. But the main thing is that you will only see the account with your username and the Administrator account is hidden but its there and you can easily access that using the following steps:
Step1: Start your computer.
Step2: Now let it start until the windows user's username appears as shown in snapshot below...
how to hack admin password,hacking password,reset admin password, system hacking

Step3: As This Window Appears Press Ctrl+Alt +Delete (2 times).. Now the Windows like shown below appears..

how to hack admin password,reset admin password,hack computer password

Step4: Now as shown above Enter the Administrator on the Username box and press enter... Now you will be login in the admin account can easily rest the password...

For Resetting password you can follow two Procedures..
Procedure 1: Goto Start --> Control Panel --> User Accounts.. Now select the account whose password u want to reset.
Procedure 2 : Follow the Next method i.e hacking password through Net User Command.

Note: Hack 1 will only work if Administrator(default) is unsecured i.e User as some other username like above shown figure...


2. Hacking admin or administrator account using net user command
Note: This will work only when user has access of user account or some how he has been allowed  or working in admin account.

Steps to hack admin account:
Step1: Goto the Start and click on Run and Type cmd and press enter ... 
Step 2: Now type "net user" in the command prompt to obtain the All accounts on that computer.. as shown in figure..

how to hack admin password,reset admin password,hack computer password,windows password hacking


Step 3: Now Select the account Which u want to Reset the Password...
Suppose that we want to Reset the Password  of Administrator...
Now Type "net user Administrator *  " Without quotes... and press Enter. As shown in the Below Figure..

reset admin password,hack computer password,windows password hacking

Step 4: Now after that press Enter Twice to rest the password. Now Next time u open that Account .. It will not require any Password..


3. Hacking admin account using ERD commander (100% working hack)
This hack has no restrictions , using this hack you can hack each and every computer.

First of all Download the ERD(Emergency Rescue Disk)  commander... Extract the Files and Make a CD...

STEPS INVOLVED :
1. Insert the ERD Commander Boot CD into the drive and restart the system
2. Boot the computer using ERD Commander Boot CD. You may have to set the boot order in the BIOS first.
3. Select your Windows XP installation from the list as shown.


How to hack Admin Account
4. From the ERD Commander menu (Start menu), click System Tools and click Locksmith
How to hack Admin Account

5. Click Next

How to hack Admin Account

6. Select the administrator account from the list for which you want to reset the password.
How to hack Admin Account

7. Type the new password in both the boxes, click Next and click Finish

How to hack Admin Account

8 . Restart The System and take the CD out of the Drive..And Enjoy Admin account...

Method 4: Resetting windows password using Ubuntu Live CD or DVD
For this hack you will require the Ubuntu Live CD.

Steps involved :

  1. Insert Ubuntu Live CD and boot from it.
  2. Open terminal and install chntpw in Ubuntu. To do so use the following commands.
    sudo apt-get update
    sudo apt-get install chntpw
  3. Now mount your Windows volume. In my case it was dev/sda1. Replace it with yours.
    sudo mkdir /media/WINDOWS
    sudo mount /dev/sda1 /media/WINDOWS
  4. Now navigate to the Windows configuration folder.
    cd /media/WINDOWS/WINDOWS/system32/config/
  5. To reset the administrator password enter
    sudo chntpw SAM
  6. After completing this command you will see 5 different choices. Select the 1st one and press Enter and its done. 
  7. Now restart your system, it will not ask any password.  

  • Digg
  • Del.icio.us
  • StumbleUpon
  • Reddit
  • RSS

Manually Hide any file in JPEG

Hello Friends, today i will explain you how to hide any file behind the JPEG image manually that is without any software. Its a very easy trick and also very useful if you want to send information secretly to your friend. Also its different from stenography as it does hides text behind images or text behind mp3 files. Its universal, you can hide any file, virus or Trojan or anything behind image using this trick


Things that you will need for this trick:
1. Winrar installed on your system.
2. Little knowledge of command prompt.


hide files, hide files in images,how to file virus,hiding trojans


Steps to Hide any File behind JPEG image Manually
 
1. Create an folder into C drive (recommendation is that use this C:\Hidden).

2. Now gather all files that you want to hide in this folder.

3. Now add these all files to compressed .rar file using winrar 
(example myhiddenfiles.rar ).
Note: This rar file should be in the same directory (i.e. C:\Hidden)

4. Now Select the JPEG file that you want to use to hide the above content 
(say myimage.jpg). Put this image file also in the same folder that is in C:\Hidden

5. Now, open Command Prompt (Go to Run and type ‘cmd‘). Make your working directory C:\hidden.
  (When you open CMD you will get like C:\Documents and settings\username (something like this)
 Now type cd.. and press enter and then again type cd.. and press enter. Now you have something like this in cmd  C:\   . Now in front of that type cd "Hidden"  and press enter. )

6. Now type: “COPY /b myimage.jpg + myhiddenfiles.rar outputimage.jpg” (without quotes) - Now, myimage.jpg is the picture you want to show, myhiddenfiles.rar is the file to be hidden, and outputimage.jpg is the file which contains both....

7. Now, after you have done this, you will see a file output.jpg in C:\hidden. Open it (double-click) and it will show the picture you wanted to show. Now try opening the same file with WinRAR, it will show the hidden archive...

This hack will help us to hide things behind the JPG file without any software. i hope you all have liked it. For more such hacks keep visiting.
 
(sumber diambil daripada hackguide4u blog)

  • Digg
  • Del.icio.us
  • StumbleUpon
  • Reddit
  • RSS

Solving Sudoku Using Excel | Download Workbooks And Procedures To Solve Sudoku

Almost all Newspaper and Journal started publishing a daily Sudoku puzzle in their comic or strip pages. And most of us, including me has nearly became addicted to solving these puzzles.


Sudoku is a 9x9 grid. In the newspaper each day, they may fill in 20-30% of the 81 numbers in the grid. Your goal is to fill in the remaining numbers. Each row, column, and 3x3 sub-grid must contain each of the digits from 1 through 9 without any digits repeating.

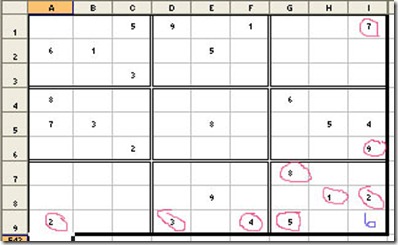
When you consider the puzzle below, the top left square can not contain 1, 5, 6 or 8 because these numbers already appear in the first column. The top left square can not contain 4 or 9 because these numbers already appear in the same row. It can not contain a 4 because a 4 appears in the upper-left 3x3 sub-grid. 

Solve Sudoku with Excel 1

Thus, the possible numbers for the top left cell are 2, 3, or 7. Trying to solve the puzzle from the morning paper quickly consumes all of the time for breakfast and can make you late for work if you are not careful.

Microsoft Excel Work Book By Mike Oldroyd :
Mike Oldroyd has created an Excel workbook to solve Sudoku. I have attached that, and the VBA code is also available. So anyone who is interested can poke inside to see how it works.
This workbook is very cool. It gives you the complete solution in a few seconds. It would probably be cooler if you want to reveal the one square that you may stuck on. Sometimes, if you could just solve one square, the rest of the puzzle would start to fall into place.
 I've zipped it at this link. For more about Mike, visit http://www.mikeoldroyd.com/.

Microsoft Excel Work Book By Jobey Jones:
There is also another workbook from Jobey Jones, England. This is a workbook that is a Sudoku Assistant. Instead of giving you the solution, it makes quick work of a lot of the work involved in solving Sudoku.
Enter the puzzle in his grid, and many formulas provide statistics. The fact is that the digits from 1 through 9 add up to 45, so first Jobey figures out the total for each row, column, subgrid and compares this to 45. He reports which numbers are missing in the row, the column, and each subgrid.
My favorite part is this section where he shows which numbers are still possible in each cell of the grid. Clearly, the 2nd column in the 5th row must be a 9, since that is the only value left.

Solve Sudoku with Excel

If you still want to do some of the work of solving Sudoku, download this zipped sudoku2.zip.
If you have both programs, you can enter the puzzle in one form, then use Copy / Paste Special - Values to copy to the other program.
Microsoft Excel Work Book By Jerry:
Jerry from Erie, New York has created another workbook that is a Sudoku solver. This one is cool because it lets you see how to solve Sudoku iteratively. Enter the puzzle from the paper. Jerry's workbook shows you which squares can be solved right now. Click Solve to put those numbers in the grid. Then, new squares light up in yellow as being solvable.
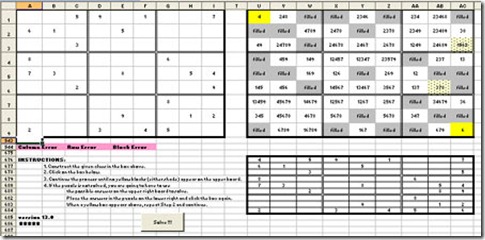
Press Solve to put those squares in the grid. If you are new to Sudoku, this will help you to understand that solving Sudoku is a step by step process.
Enter the puzzle in the upper left grid.

Solve Sudoku with Excel 3
The upper right grid will light up in one of two shades of yellow to tell you the squares that can be solved.
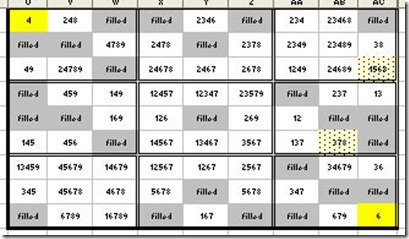
Solve Sudoku with Excel4

Here is how it knows the lower right square has to be a 6: All of the other numbers from 1 through 9 are already used: 2, 3, 4, and 5 are in the same row. 4, 7, and 9 are in the same column. 1, 2, 5, and 8 are in the same subgroup. This means the only possibility left is a 6.

Solve Sudoku with Excel5

Click the Solve!!! button to transfer the yellow squares to the upper left grid. Once that information is known, new yellow squares show up in the upper right. Continue the process.
Here is a good example in the second round. There are three unfilled cells in the right column. They all could host a 3. The one in yellow can only host a 3, meaning that the square with the possibility of a 3 or 8 must be an 8. In these cases, the 3,8 square is highlighted in lighter yellow and when you click solve, an 8 will be sent to the grid. The lower right grid shows you which of the light-yellow numbers will go to the grid. Download it zipped from JerrySuduko.zip

Microsoft Excel Work Book By David Dawson:
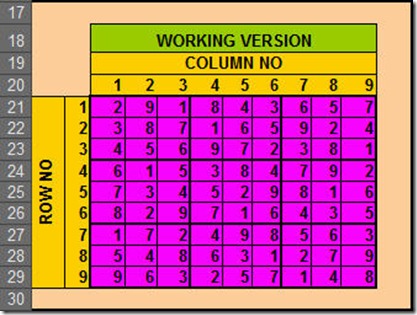
Update For 2010! David Dawson of Sydney has created along his version of a MS Excel Sudoku solver. The interface is colorful and offers not only the working version of the puzzle, but the starting puzzle as well.

Solve Sudoku with Excel7
Solve Sudoku with Excel8
You may download the zipped version of David's Puzzle using DDawsonSuduko.zip
bench3 provides examples and procedures for illustration only, without warranty either expressed or implied, including but not limited to the implied warranties of merchantability and/or fitness for a particular purpose. Also, the workbooks and procedures on this web site are provided "as is" and we do not guarantee that they can be used in all situations.

  • Digg
  • Del.icio.us
  • StumbleUpon
  • Reddit
  • RSS

Control Two Computers With a Single Keyboard and Mouse

Let’s say you have two computers on your desk and, in an effort to save space, you want to operate them all using a single pair of keyboard and mouse.
There are two solutions here. If the computers are connected to the same network, you can use software programs like Input Director or Synergy to operate them with a common keyboard and mouse. In the other scenario where the machines aren’t connected, you can get a KVM switch to share one keyboard and mouse between them.

One of the better alternative is to go for Mouse without Borders. My work setup is quite similar to what you see in the illustration above and I have been using the Input Director software all this while to control the two Windows PCs with one keyboard and mouse. Input Director is reliable and (mostly) works without problems though it does require some understanding of the Master and Slave concept.
And alternatively, Mouse without Borders will see things even better and easy than the previous solutions.
The best part about Mouse without Borders is how easy it is to set up. You install the utility on all your Windows computers, enter the security code provided by the software and your computers will get linked. This is almost as simple as pairing a set of Bluetooth devices.

Step by Step Instructions On Installing and Configuring Mouse without Borders:
Step 1 of Installing Mouse without Borders:

Installing Mouse without Borders – Step by Step 1

Step 2 Installing Mouse without Borders:

Installing Mouse without Borders – Step by Step2

Step 3 Installing Mouse without Borders:

Installing Mouse without Borders – Step by Step3

Step 4 Installing Mouse without Borders:
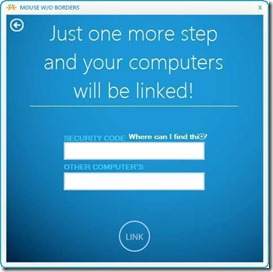
Installing Mouse without Borders – Step by Step

Once installed, you can not only use the same keyboard and mouse across your computers in a seamless manner but you can also drag and drop files between them. This is so convenient. Earlier, I had to create shared network folders or had to use Dropbox to transfer files but now I can simple drag them from desktop A to desktop B as if they were on the same computer.

With the Mouse without Borders utility installed, you can also send screen capture of one desktop to another by pressing a hotkey or from the system tray menu. After having used the tool for about a week, I never experienced a crash though I did have problems sharing clipboard especially when the copy operation was done inside a Flash application.

Mouse without Borders can only be used to control Windows based computers. If your work environment involves a mix of Windows, Linux or Mac computers, Synergy could still be the only good choice for you.

  • Digg
  • Del.icio.us
  • StumbleUpon
  • Reddit
  • RSS

How To Fix Website Loading Time and Speed Up Firefox

Everyone wants web sites and web pages to load faster, there really isn’t anything more time wasting then waiting for a web site to load up, it really comes down to three main factors, your web browser, your internet connection and the server the website your trying to load. Obviously if you’ve got a crappy web browser, like IE6, then it’s going to take longer to load then say you were using Firefox, if you have a better internet connection, then you’ll be able to load websites better and if the website is hosted on a decent server, it’ll load faster.

Speed Up Firefox How To Fix Website Loading Time and Speed Up Firefox


Now I’ve always found Firefox is be pretty quick, but then I learnt you were able to modify some of the settings within Firefox to make it load websites even faster and in this how to, I’m going to show you exactly how you can boost the speed Firefox loads web pages at, plus explain what we’re changing and why, so instead of just following simple instructions, your learning what your changing and how it’s going to effect your website loading times.

If you really want too, you can use Addons for Firefox, which tell you how long it takes websites to load, one which I’m a fan of, is called Extended Statusbar, if you really want to work out how much you’ve increased your website loading times, you can use this sweet Firefox Addon to do so, so lets get started. But they won’t fix website loading time, but only show you info on this.

First off, we’re going to need to open up the config within Firefox, this is super easy to do, just open a new tab and type in the address bar, about:config – It’s that simple, you’ll then see some warning message because playing with the config settings can screw up your browser, so read carefully! Click “I’ll be careful, I promise” and lets get started!

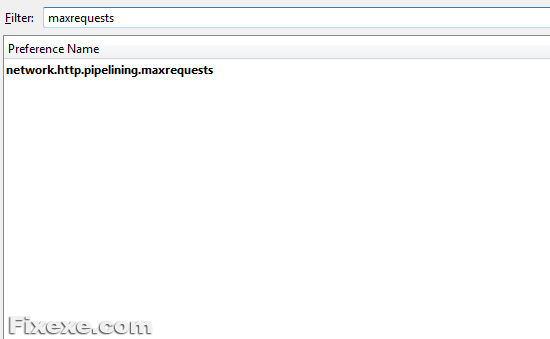
At the top of the config, you’ll see a “Filter” bar, we’re going to be using this to find the fields we need to edit, which is going to save us a lot of time, the first thing we’re going to change, search for network.http.pipelining, it’ll be set to disabled by default, so change this to enabled. What pipelining is, in simple terms, it means you can send multiple requests to a server, before it has replied, not every server supports pipelining, but this is a decent way to speed up the load times on the websites which do support it, now find network.http.pipelining.maxrequests and set this to 8, this is the maximum number of pipelining requests Firefox will make, we’re also going to need to find network.http.proxy.pipelining and enable that too.
About Config Firefox How To Fix Website Loading Time and Speed Up Firefox

Now by default, if something was to pop up on your Firefox, it stops loading the webpage in the background, we are going to change this, so if a UI event does happen, the page will still load in the background, by default Firefox doesn’t have this one in the config, so right click (Anywhere white in the config) and click “New” and then “Boolean”, enter content.interrupt.parsing and set it to “True”, we’ve already made some changes to improve your speed, but there are still more we can make! If you’ve come this far, everything else is really simple to do.
For the rest of the tweaks, we’re going to need to add new data to our config, so instead of carrying on in a article format, I’ll leave it in a easier format for you to follow/read, there is a lot of copy/pasting involved as well, so this’ll make your life easier while following this article.

Create a new integer, name it content.max.tokenizing.time with a value of 2250000.
Create a new integer, name it content.switch.threshold with a value of 750000.
Create a new integer, name it content.notify.interval with a value of 750000.
Create a new integer, name it content.notify.backoffcount with a value of 5.
Create a new integer, name it nglayout.initialpaint.delay with a value of 0.
Create a new boolean, name it content.notify.ontimer and then set it to True.
 
Once you’ve done all of this, restart your Firefox (Close all Firefox windows, like you’ve just added a new add-on/updated your Firefox) and you’ll hopefully notice a huge increase in load times, I sure did!

  • Digg
  • Del.icio.us
  • StumbleUpon
  • Reddit
  • RSS

Remove Windows Not Genuine Watermark Without Using Any Patches And Cracks

In this article we will learn how to make your Windows 7 Genuine without using any crack or third party tools. Please remember we on bench3 do not motivate you to use non genuine windows. This is not a patch or crack stuff. We are just using the build in VBS code that Microsoft have developed for some other reason.
Warning! This article has been given only for informational and educational purpose. We do not encourage pirated or illegal software. If you’re using an illegal copy of the software, please purchase an original copy. bench3 is not responsible for your work or use.

The first time you power up Windows 7, you may feel a sense — it looks very similar to Windows Vista. However, behind the familiar UI lies a more powerful and versatile operating system. The activation part is not the same as you know in case of Windows Vista. What ever it is, if you want to know the new features of Windows 7, Here are some of the most prominent new features in Windows 7. Read more: http://www.bench3.com/2009/10/new-features-of-windows-7-new-in.html

If you have purchased Windows 7 from Microsoft Store or from other vendor, we would recommend you to read the official document related to activating Microsoft Windows 7 in the following location. http://windows.microsoft.com/en-IN/windows7/Windows-7-activation-error-invalid-product-key 

Here is an simple way u can make your windows 7 genuine. No need to use and third party patches or cracks. Just a simple way.

Before  you continue , please make sure you have administration rights on the Windows 7 machine which you want to make genuine.

1. Click Start and type cmd in start menu search box (Refer Screen Shot).
2. right click the cmd.exe and choose run as administrator (refer Screen Shot).
3. Choose yes if it asks.
4. Now Now in the command prompt window, type slmgr -rearm and press enter (Refer Screen Shot).
5. Restart your system. Try to restart your system twice.
6. You are done.

  • Digg
  • Del.icio.us
  • StumbleUpon
  • Reddit
  • RSS

Ultimate Windows Genuine Advantage (WGA) Remover

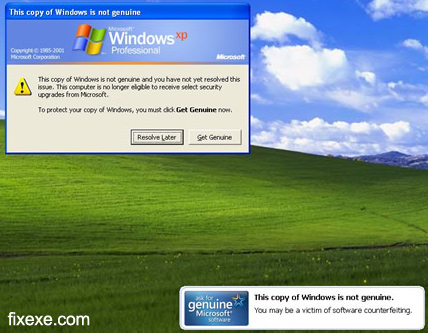
Here is the ultimate Windows Genuine Advantage (WGA) remover for those who are getting annoyed by the Windows Genuine Advantage popping up every few second.
windows genuine advantage Ultimate Windows Genuine Advantage (WGA) Remover

You did install the latest updates recommended by Windows, now you get a message saying: this copy of Windows is not genuine, you may be victim of software counterfeiting.
To disable Ultimate Windows Genuine Advantage (WGA) once for all, simply download and install WGA remover.
zip Ultimate Windows Genuine Advantage (WGA) Remover  WGA Remover (1.0 MiB, 442,881 downloads) Updated in October, 2011 – this version of WGA Remover is recommended for Windows7 users.
zip Ultimate Windows Genuine Advantage (WGA) Remover  WGA Remover 2011 for Windows 7 (1.6 MiB, 906,177 downloads)


Once patch is installed, reboot the Windows.

Do you still have problems? It's recommended to run the best fix tool to repair and speed your PC!
 
 download Registry Easy (4.7 MiB, 7,795 downloads)

  • Digg
  • Del.icio.us
  • StumbleUpon
  • Reddit
  • RSS