www.esoftwaresource.blogspot.com. Powered by Blogger.
RSS

Kongsi folder dan printer antara win xp dan win 7

Banyak cara untuk membuat perkongsian ini.Antaranya adalah,menggunakan ip address.Sebagai contoh,di pusat akses sekolah,terdapat satu printer dan 10 client yang menggunakan win XP.Namun,semua ini ingin menggunakan printer.Begitu juga dengan guru yang ingin menggunakan laptop untuk terus print.Salah satu cara yang mudah adalah jadikan sebuah pc di pusat akses  yang telah siap dipasang driver sebagai master.

langkah-langkah...
1.Setkan printer sebagai sharing


2.Pada pc master,lihat ip address untuk di taip pada mana-mana pc yang ingin guna printer.

3.Pada pc client,(win xp ataupun win 7)pergi ke start menu ---> pada ruang search programs and files,taip ip address yang ada printer (master)


4.Paparan berikut akan keluar (dwi-klik pada model printer yang share td)


5.keluar pula paparan ini..maknanya proses membuat sharing berjaya

6.Pergi ke menu device and printer untuk lihat paparan dibawah.
printer yang ada ip adalah hasil dari sharing
7.Kini,anda boleh print...

(semua ini hasil daripada pengalaman membuat sharing di pusat akses,makmal komputer dan pejabat..Contoh diatas adalah win xp sebagai master dan win 7 sebagai client.Yang penting,turn off firewall) 

<---AMIGOSSS,PROVOSSS,GETLOSSS AND BRAMBOSSS--->
 lain orang,lain caranya

  • Digg
  • Del.icio.us
  • StumbleUpon
  • Reddit
  • RSS

15 Killer Windows 7 Keyboard Shortcuts That Might Surprise You

Killer Keyboard Shortcuts for Windows 7
One of my personal favorites among the new features that Windows 7 came with was the introduction of some awesome and long awaited keyboard shortcuts. I personally use them as much as I can to save time, and I recommend the practice of using keyboard shortcuts to others too.
This article talks about 15 really cool keyboards shortcuts that are specific to Windows 7. I can bet that you don’t know all of them. Check them out, some of them will surprise you for sure.

1. Ctrl+Shift+N to Create a New Folder

Create a new folder with a shortcut key
Creating a new folder in Windows explorer is something we all need to do on a frequent basis. And until now, there was no default shortcut key available for this task. But Windows 7 changed that.
You could now use Ctrl+Shift+N to quickly create a new folder in Windows or anywhere on your computer where a folder can be created.

2. Ctrl+Shift+Click to Open a Program As Administrator

run as administrator
There are many instances when just clicking on the icon of the application and opening it doesn’t solve your purpose. You need to right click on it and click on “Run as Administrator” so that you can make the required changes to the app.
In Windows 7, this can be done with a keyboard shortcut. You just need to point your mouse cursor on that program and then click on it while pressing Ctrl+Shift keys to open it as administrator.

3. Shift+Right-Click Enhances Send to Menu

send to menu
The above screenshot shows the default send to menu that I get when I simply right click on a program.
Now, if I press the Shift key, and while having it pressed, I right click on the icon, I get an enhanced send to menu. See the screenshot below to check how it looks.
send to menu enhanced
Nice, isn’t it?
Also check 2 Useful Tools To Add Items & Customize the Windows Right Click Menu.

4. Shift+Right-Click on a Folder to Open Command Prompt

open command windows
If you do Shift+right-click on a folder, you’ll find an option that says “Open command windows here.” If you love working with the command prompt, this option should come in handy.

5. Win+Space to Quickly Show Desktop

Remember our quick tip on hiding open windows in windows 7 ? Well, this is the keyboard shortcut version of that mouse cursor trick. Pressing the Win key and the space bar simultaneously shows you the desktop immediately.

6. Win+Up/Down/Left/Right for Moving the Active Window

Create a new folder with a shortcut key
If you intend to quickly move the active window to make space for other apps, you could do that by using the Win key and one of the arrow keys. Each arrow key would move the window in the direction it is meant to.

7. For Dual Monitors: Win+Shift+Left Arrow Key to Move Active Window to Left Monitor

If you are on a dual monitor setup using Windows 7 then you could press the Win+Shift+Left arrow key combination to move the active application window to the left monitor.

8. For Dual Monitors: Win+Shift+Right Arrow Key to Move Active Window to Right Monitor

Similarly, if you need to move the current window to the right monitor screen, just press Win+Shift+right arrow key.

9. Win+T to Get to Taskbar Items

windows 7 taskbar
You could use the key combination Win+T to toggle through the applications pinned on the taskbar in Windows 7.

10. Shift+Click on a Taskbar App to Open a New Instance of the App

Let’s say you’ve got a bunch of Chrome windows open. And you need to quickly open a new blank window of the browser. Here’s the way – point your cursor to the chrome icon on the taskbar, hit Shift and click on it. There you go!

11. Win+B to Move Focus to the System Tray

system tray
In a previous article, we talked about a technique to add more clocks to the default Windows clock in the system tray. Now, if you need to get there without using your mouse cursor, how’d you do that?
Answer – Win+B. That would move the focus on the system tray, and then you could use the arrow keys to cycle through the items, including the Windows clock.

12. Win+P for Quickly Connecting Your Laptop to a Projector

projection menu windows 7
Windows 7 has a nifty projection menu feature which enables you to quickly connect your laptop to a projector or an extended monitor. Win+P is the keyboard shortcut for that purpose.

13. Win+1, Win+2..so on for Opening Taskbar Programs

Want to quickly open a program that’s pinned to your Windows 7 taskbar? You can press the Win key and the number corresponding to the location of the app on the taskbar.

14. Win+Pause helps you check System Properties

system properties
Need to take a quick look at what’s the processor model you are using, or may be check the device manager, or advanced system settings? You could use Win+pause key combination to open the system properties window.

15. Ctrl+Shift+Esc Can Quickly Windows Task Manager

I think this was in Vista too, I am not sure. But it’s a cool shortcut nevertheless. Just press the Ctrl key, Shift key and the ESC key simultaneously and you have the task manager pop up right in front!

  • Digg
  • Del.icio.us
  • StumbleUpon
  • Reddit
  • RSS

Share Files and Printers between Windows 7 and XP

If you have a home network and are running Windows 7 and have XP on other PC(s) you might want to share files between them.  Today we will look at the steps to share files and hardware devices like a printer.
Sharing Files In Windows 7 and XP
Sharing folders between two Windows 7 machines with the new HomeGroup feature is an easy process, but the HomeGroup feature is not compatible with Vista or XP.  For this tutorial we are using Windows 7 x64 RC1 and XP Professional SP3 connected through a basic Linksys home wireless router. 
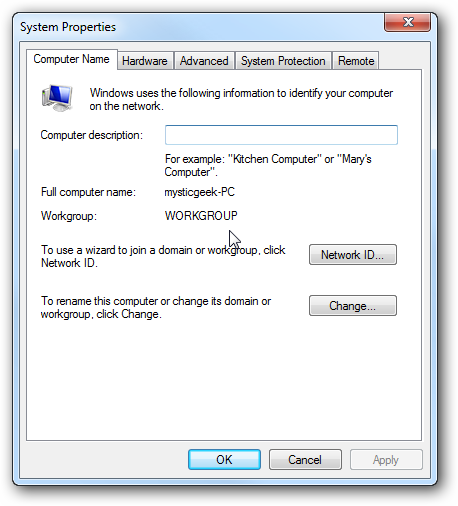
First make sure both machines are members of the same Workgroup which by default is named Workgroup.
workgroup 
On the Windows 7 machine go into Control Panel \ All Control Panel Items \ Network and Sharing Center then click on Change advanced sharing settings.
network and sharing
advanced
You will want to verify the following settings under Advanced Sharing Settings for the Home or Work and Public profile.
home or work settings
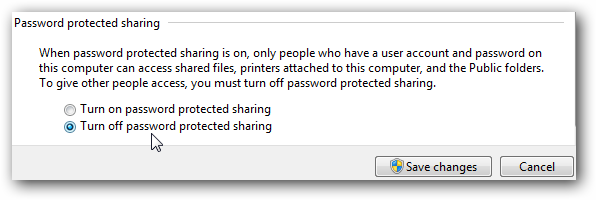
If you want any user to have access the public shares turn off password protection.  This is located in Advanced Sharing Settings toward the bottom of the list. 
 turn off pw
If you want to keep it enabled make sure there is a log in account for the other XP machines and they have a password.
create pw
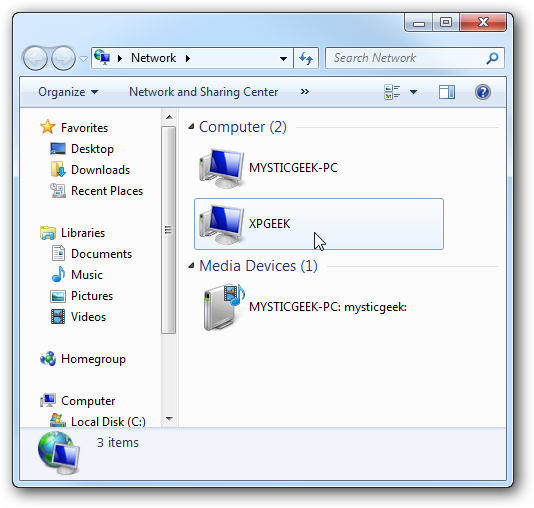
Now if you go into Network in Windows 7 you should see your XP machine and the Windows 7 as well which in this case is Mysticgeek-PC.
Explorer
To share the printer on the Windows 7 machine go into Devices and Printers from the Start menu and double click on the printer icon.
devices
Next double click on “Customize your printer”.
1 Printer
In the Properties screen click on the Sharing Tab and check the box to share the printer and type in its share name.
2 printer share
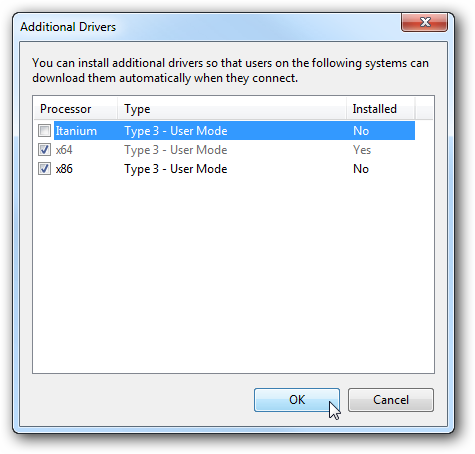
If your XP machine is an x86 OS you can install Additional Drivers before setting up the XP machine.
3 Printer add drivers 
To find the shared folders and devices double click on the Windows 7 machine icon under Network.  Here you can see the printer connected to my Windows 7 machine is shared and also the Users Folder.
shared device and users
Continue into the Users folder and Public to see the shared folders, here I also created a folder called XP Share just to keep everything in central location.
xpshare
Over on your XP machine open up My Network Places to find the Windows 7 (mysticgeek-pc) shared folder.
My Network Places
Double click on the Share folder to find a list of shared folders in the Public folder on Windows 7.  If you have password protection enabled you will need to type in the username and password of the user account on the Windows 7 machine first. 
folders
Setup XP With Shared Printer
To set up the shared printer in XP you will need to go into Printers and Faxes from the Start menu and kick off the Add Printer Wizard.
add Printer
Now select “A network printer, or a printer attached to another computer” then hit Next.
network option
Next select “Connect to this printer…” and type in the path for the printer connected to the Windows 7 machine and click next.  
print
Now click Yes to the confirmation message.
confirm msg
Then click Finish the printer to install and complete the Wizard.
Complete
In some cases you will need to install the x86 XP drivers for the shared printer because the Windows 7 drivers are not compatible with XP.  When everything is installed open up Printers and Faxes to find the shared printer.
in explorer
This should help you get started with sharing your files and other devices with your Windows 7 machine.  When I first started I was able to see the printer on XP right away because I had a HomeGroup set up, but once I deleted it I needed to share the printer like you would for a workgroup.  You might also have to do a couple restarts of the XP machine for it to see the shared resources on Windows 7.

(sumber dari http://www.howtogeek.com)

  • Digg
  • Del.icio.us
  • StumbleUpon
  • Reddit
  • RSS

Install driver secara automatik dengan HP product detection (HP sahaja)

Bagi yang kurang mahir dalam mencari driver seperti printer,laptop,dan sebagainya bagi perkakasan keluaran HP,kini dengan bantuan product detection,driver akan dapat dipasang secara automatik dengan adanya sistem rangkaian LAN.Pastikan perkakasan di connect
Berikut langkah-langkahnya:
1.perge ke web site HP atau klik link ini, http://www8.hp.com/us/en/support-drivers.html

2.Pilih detect your product


3.Klik continue
4.Ikut langkah yang diberikan seperti gambar di bawah:

 5.klik install ---> klik allow


6.Selesai....

  • Digg
  • Del.icio.us
  • StumbleUpon
  • Reddit
  • RSS

Configuring DNS

Windows 2000

  1. Go to Start ---> Settings ---> Network and Dial Up Connection
  2. Right click on “Local Area Connection” and select properties.
  3. Click and highlight the 'Internet Protocol (TCP/IP)' entry and click “Properties”.
  4. Click on “Obtain an IP address automatically” and select “Use the following DNS server address”
    Details to be used :
    Preferred DNS server: 202.188.0.133
    Alternate DNS server: 202.188.1.5

Windows 98

  1. Double Click: My Computer
  2. Double Click: Control Panel ---> Network.
  3. Make sure the network card (Ethernet card) is installed and in working condition. Select the TCP/IP entry for the network card and click on the “Properties” button.
  4. Select the DNS Configuration tab. Select “Enable DNS” and the add DNS address under the DNS Server Search Order. For the Host field you can put your preferred name and as for the Domain, please use tm.net.my. Type 202.188.0.133 and then click “Add” followed by 202.188.1.5 and click “Add”.

Windows XP

  1. Go to Start ---> Control Panel ---> Network Connections
  2. Right click on the Local Area Connections and select Properties
  3. Select the “General” tab and highlight the TCP/IP entry. Click “Properties”.
  4. Select the “Use the following DNS server address option”
  5. Enter the following particulars
    • Preferred DNS server: 202.188.0.133
    • Preferred DNS server: 202.188.1.5

  • Digg
  • Del.icio.us
  • StumbleUpon
  • Reddit
  • RSS